Sunday, December 26, 2010

Christmas Ornaments

(Apologies in advance for the bad quality of the pictures, I took them in my car as I waited in line to pick up the kids, after all the work I was out of time.)

This year, after a successful RS activity where I orchestrated re-making ornaments, I decided to make an ornament for each employee at work. There's only about 150 of us.


So I took several chunks of time and crunched out several options for them to choose from. Some were simple:

Some were very complex, like painting the continents on these globes:

And others were not so hard because I know a few tricks:

This last one was very popular, even though none of the people I spoke to who picked it guessed that it was supposed to be the North Pole. Ah well.

S&ST #9

I was wrapping my friend's gift and wanted to do something special for the card.
I remembered that my mom used to emboss stationary for my grandmother. So I grabbed the roll of funny paper I have that has paper on one side and foil on the other. I used a crochet hook and the groove in my paper cutter to put in the lines of a square. Then using the 60 degree angle marker I made the lines of a snowflake. Then I put the card on a Styrofoam plate and embellished it. I found the Styrofoam made a great surface for freehand embossing.


Then I remembered that we have an event at work that we need snowflakes for, so I got on the phone with a friend and did these, two at a time:

I used a printed out hexagon to get the placement right, but the rest I just free-handed on the Styrofoam plate.
Out of curiosity I did a set with foil from the kitchen.
It worked fine, but the metal on metal thing was a little uncomfortable in a mild nails-on-the-chalkboard kind of way. It was fine when the paper hexagon was on top though, so keep that in mind. I also thought, well if anyone reading this isn't the freehand type, if you print out pictures of snowflakes you can lay it over the foil and trace the whole thing for a foil replica.
You have to be a bit careful to not press too hard and tear the paper/foil, but it was a lot of fun and it sure looks pretty.

Spindly snowflakes

I have a bunch of snowflakes on my tree. Some of them my sister made, some of them I got from the thrift store. I wanted more, but as I looked at them and compared them to my recent research on snowflakes I decided I wanted a more spindly effect. I thought for a while and then realized that I wasn't thinking about it right. All I had to do was chain out for each arm and spindly lobe and then single stitch back.
So, I made several. When each was done I would pin it to a Styrofoam plate and use a dosing syringe to apply starch to it.

When they were done they looked great on the tree.

Crochet and Bead Snowflake earrings

It's my friend's birthday tomorrow. I've been making snowflakes for my tree, so once I had made enough to know what I wanted to do I made these:

For those that speak crochet:
I put the beads on the thread before starting. I took the last bead that I put on and re-threaded it, then tied the ends so that the bead was in the middle of a figure eight of thread with just a little room on either side so I could stitch into each loop. Then I put six singles, three on each loop making a circle around the bead. I built four stitch chains between each single then half stitch climbed up the first loop to the center. * I chained out six, then turned and single stitched into the second chain. One more single stitch and then I brought up a bead and went around it to tack it in with a half stitch. then I chained out three, turned and single stitched into the second chain again. I single stitched my way down the side of the lobe and arm then used half stitches to move to the top of the next loop. I repeated from * until I had completed all six arms of the snowflake and tied off. I pinned the complete work to a Styrofoam plate and used a dosing syringe to apply starch to it. In the morning it was dry and I added the ear hooks.

Vamp it up

At the beginning of the school year Tali picked out several shirts that were marketed to teens that love Vampires and the new Alice in Wonderland movie. I bought a few for me too and then we picked out stuff to make necklace and earring sets for all three of us girls to match (well okay, so Jordi doesn't have earrings). I was wearing mine (which I would show a picture of, but it's in the room with a sleeping husband right now) to work one day early this month and my friend Eric saw it. He asked where I had gotten it, because he would like to get one for his daughter. I explained that I had made it, and would happily make one for his daughter and he could just pay me back for the supplies.
So I made her this set:

And he insisted on paying me nearly twice what I spent on supplies, wasn't that sweet?
Most of the supplies I got from Wal-mart, as it is now the only store in town that sells craft supplies. I did use a few things that I had salvaged from other necklaces from the thrift store.

Sunday, December 12, 2010

Christmas Kicks

and Elf Ears. I did whole elf costumes for our float in the parade tomorrow, but I figure the boot covers and the ears are all I'm going to bother posting.

Christmas Kicks
ie covers that look like curly elf shoes
For this you will need:
Christmas music playing in the background, I recommend Frank and Bing.
Boots, or shoes to wear under the covers
Felt by the yard, not the bitty squares
Pipe cleaners
Velcro (or not, if you are wearing over tights)
elastic (just a foot or so)
faux fur for the top
sewing machine, thread
needle, more thread
jingle bells
measuring tape

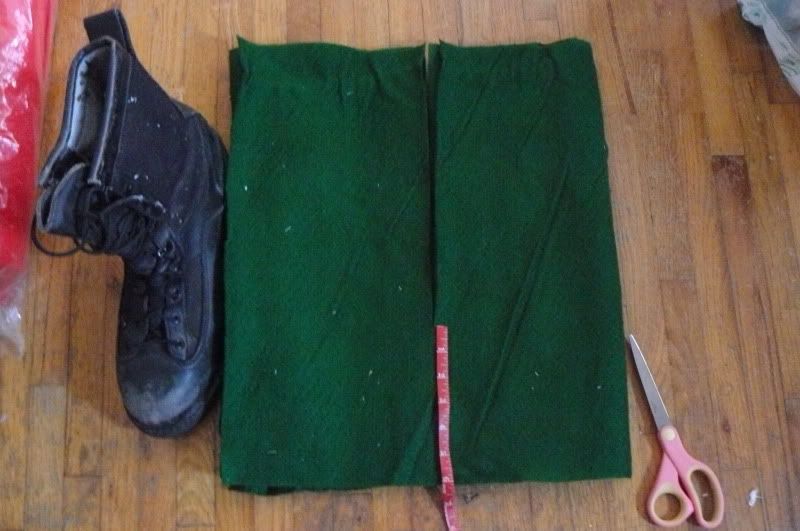
First, put on the boot/shoe and measure. You will need to know how big around to make the leg part, how tall to make the instep, and the circumference of the sole (heel, around the toe and back again.

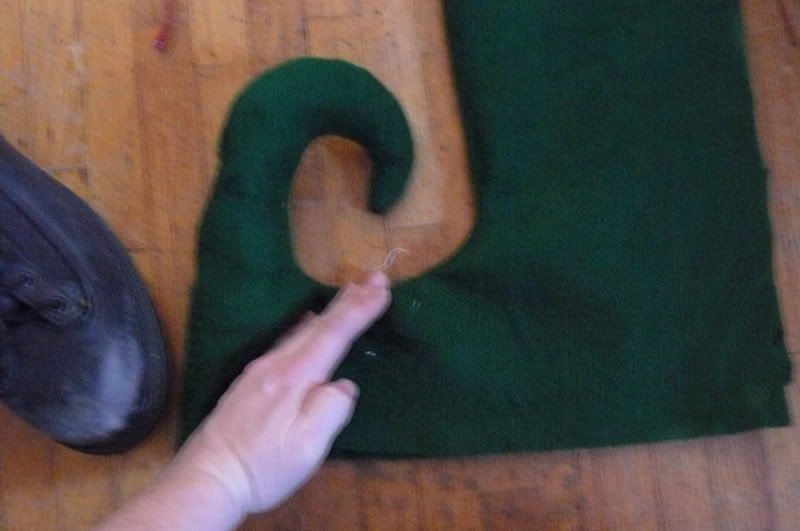
Second, measure and cut, leaving half inch seam allowance. So, calf measure divided by two plus one inch is the width of each half of the the top of the boot, etc. Notice the toe is on the fold and is not cut.

Then cut the curl like so:

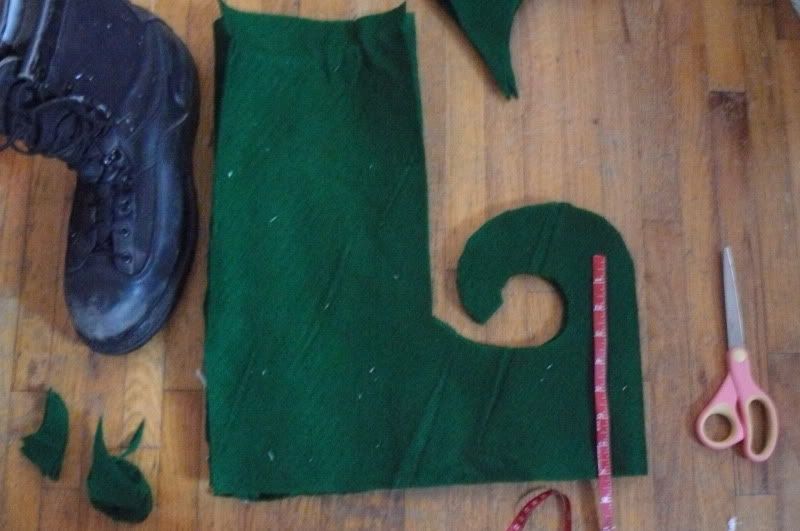
Notice the toe is still not cut.

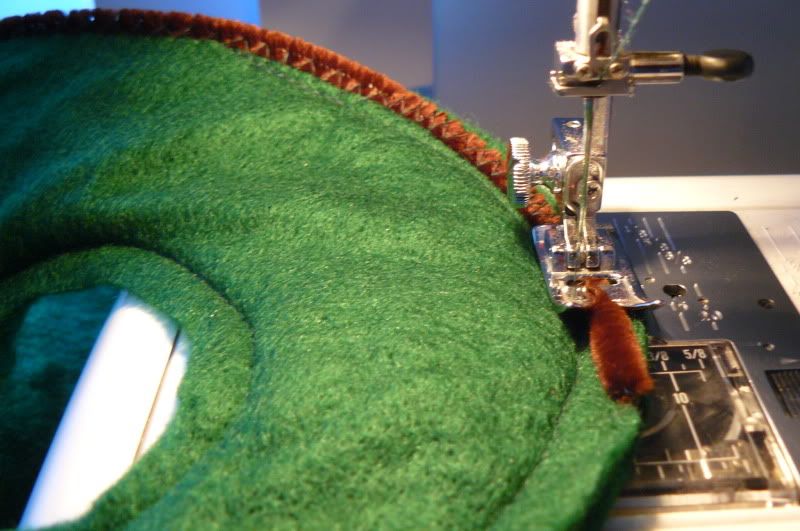
Sew down the front of the boot and around the curl.

Then zig-zag on a pipe cleaner in the toe/curl for support. The stitches on the fabric will stretch out and be invisible if you use the same color thread.

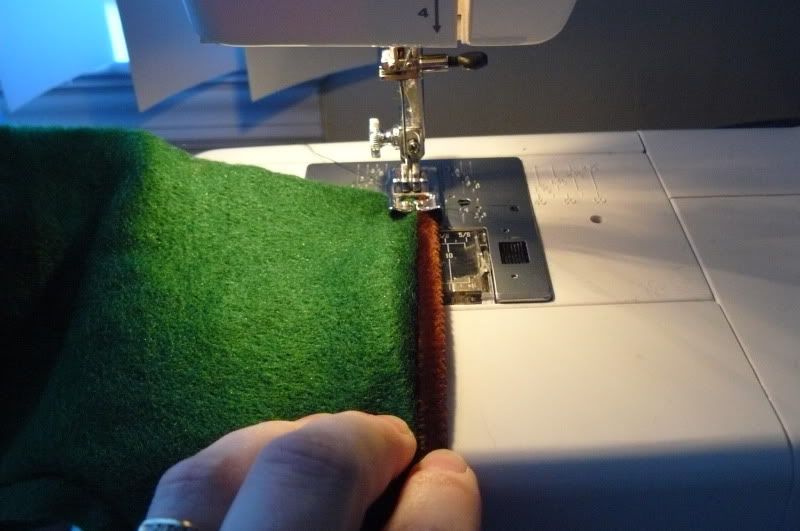
Once you are to where the seam is you can bring the pipe cleaner into the center of your zig-zag.


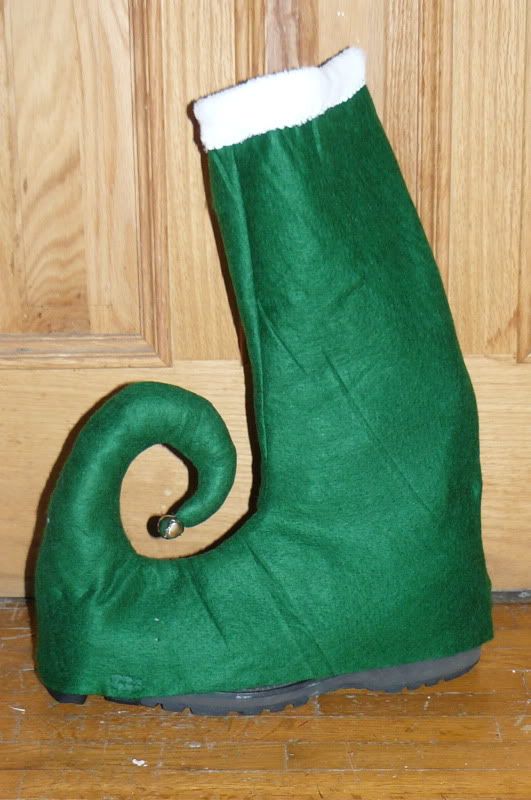
Sew back seam or sew Velcro in at back seam hard side on the outside soft on the inside. Sew on the faux fur.


Turn, straighten the pipe cleaner and stuff with scraps from when you cut the boots out. I stuffed to an angle at this point, and then baste stitched by hand to keep it in place at the angle to rest right on the boot toe.


Fit to boot, pin a piece of elastic about 3 inches back, running under the sole. Remove and sew, this keeps the cover toe down and the curl standing up.

Add your bell.

Put them on and tap your feet to the music while you sew the rest of your costume.

Elf ears:
You will need:
The plastic cross-stitch stuff, don't ask me what it's called, I don't think I've ever used it for it's intended purpose.
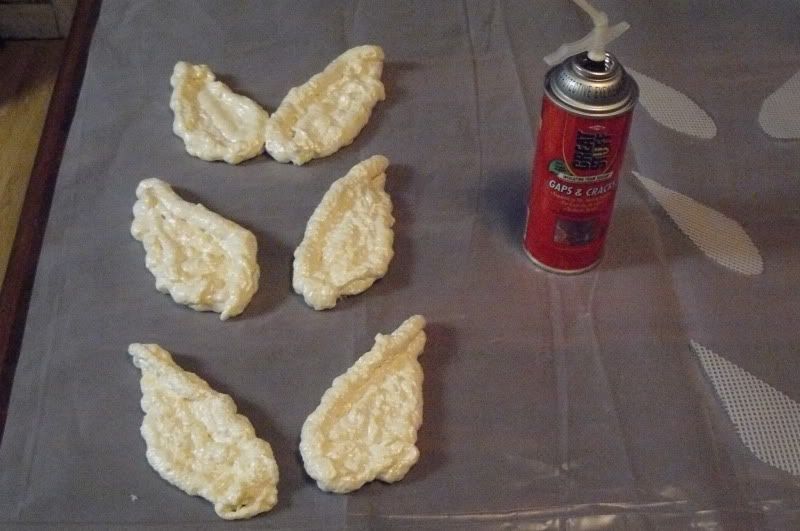
Great Stuff - That's the brand name, it's spray insulation foam from the hardware store, in the insulation isle, and if you can get the "gap filler" not the "window-door" gap filler is sturdier.
Modge-podge
Paint the color of the skin tone you want. Personally I'm "buttermilk."
Knife, scissors, paintbrush
PLASTIC SHEETING AND RUBBER GLOVES (great stuff does not come off ANYTHING it gets on when it is wet, I've worn it for a week before I shed enough skin to get rid of it)
TIME, Great Stuff must cure over night before you can move it, then the modge-podge must dry overnight. The paint doesn't take as long.

Cut the plastic grid stuff into the shape you want. You are making the backing for your ears. This way you can sew through the foam and it won't rip off the thread. I traced my ear onto a paper towel with a marker and went from there.

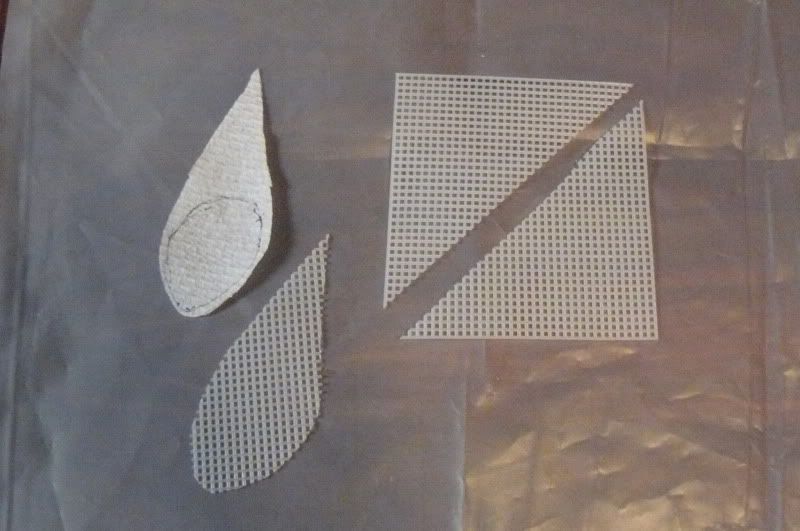
Lay the ear backings you just made on the plastic sheeting. Leave large gaps between them, great stuff expands.

Shake the Great Stuff can until your arm hurts, screw on the pipe thing and carefully, gently dispense to cover your ear backings.


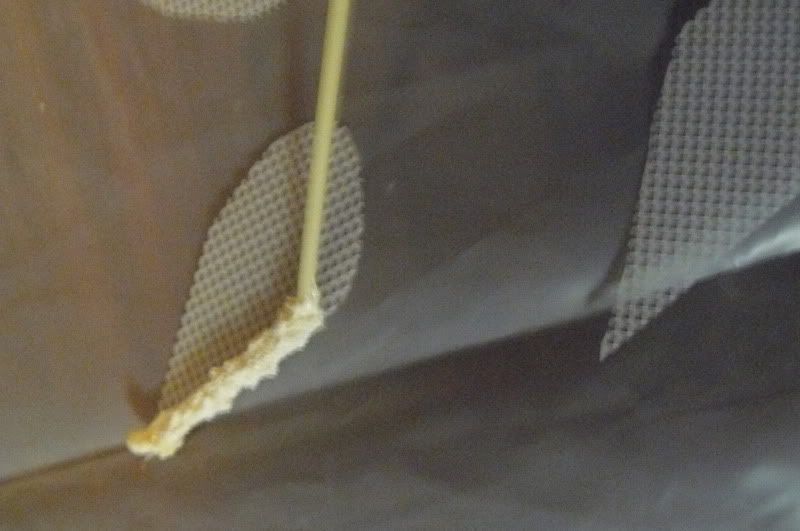
DO NOT TOUCH, DO NOT LET YOUR HUSBAND TOUCH, DO NOT LET THE PETS IN THE ROOM until it is dry.

(If your husband squawks about wasting the can of Great Stuff let him go play with it in the basement, but make him hold a paper towel under the tube as he crosses the floor. My husband can save a can for later use, but it's a pain and isn't 100% effective to clean the tube like he does because sometimes it clogs inside the can.)

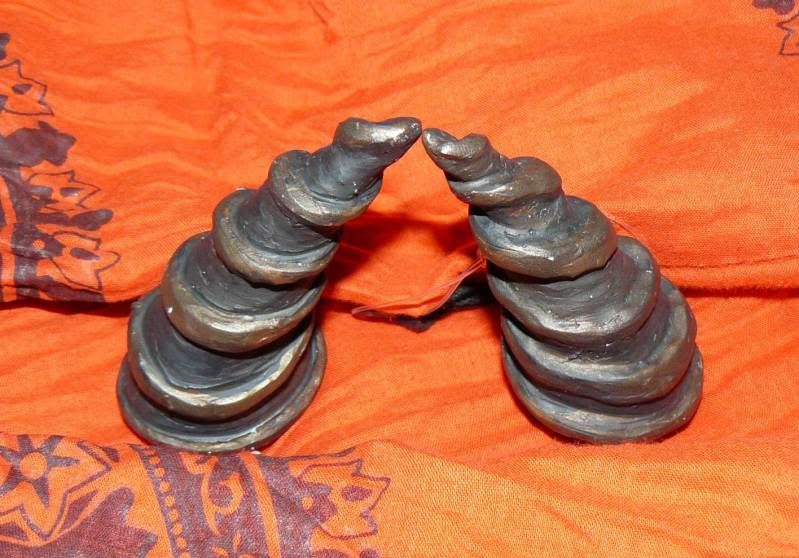
When the ears are dry you can leave them bumpy and misshapen or shave them to a better shape with a serrated knife, like a steak knife.

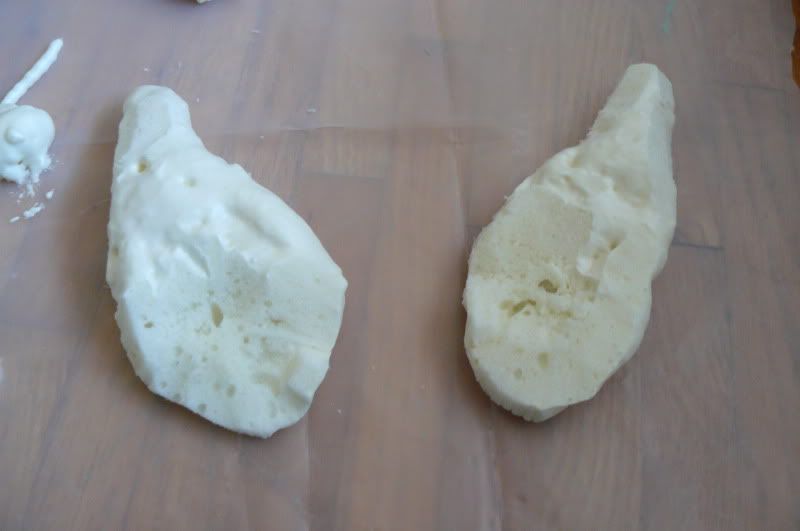
Paint with modge-podge. Modge-podge will stick to the great stuff, paint just beads off. It will also help fill the little holes. Let dry.


Paint with paint, let dry. Sew onto a stocking cap or headband.

Somehow I did not get pics of that part... ah well. Maybe I will get some before the parade.

Friday, November 5, 2010

Sr. Missionaries Sculpture

Our Ward's Sr. Missionaries are leaving soon. We tried to talk them into staying, but it hasn't worked so far. My friend was saying he wished we could pull something together to show how much we appreciate them. Their departure date got moved up so we are kind of in a time crunch. So I did this between shifts this week. Thankfully sculpey can be left out for ages without getting hard so I could put in a few hours here and there.

Yes, I've thought about painting it, and no, I don't think I will, unless I paint it white.

P1020632.jpg picture by teljchall
P1020634.jpg
P1020635.jpg
P1020636.jpg

Sunday, October 31, 2010

Making Halloween Horns

This is kind of a Hall Hollow-ish post because the kids did the project with me tonight, but because it's a how-to I'm sticking it here.

I did a set of these for myself the other Halloween, and I wore them this year to work.

Horns.jpg picture by teljchall
A little girl liked them, so I said I would make some for her. I decided to do unicorn horns, one for her and one for her twin sister. They have long blond hair, I couldn't resist.

To make these you need:
Sculpey
Aluminum Foil
Toothpick
Ribbon
Heavy clear fishing line
Paint
Insane desire to have horns

You'll want two pieces of foil really, one to make a cone for the inside of your horns and one to protect your table from the sculpey and paint.

Start with a toothpick and a long sheet of foil, three feet should do for three to four inch horns. The toothpick is a placeholder for when you need to string the horn. You fold the foil several times until you have a strip. Then you place the toothpick perpendicularly about 1/3 of the way down the strip. You fold it over then wrap and twist the foil to make a horn with one or two wraps of the foil going below the toothpick and the rest making a cone on top of it. The foil core makes the horn bake evenly and prevents cracking. It's also cheaper than a wad of sculpey.
I form the cone and then flatten the base by shoving it into the table so it stands well and will sit flat on the skull. If you want a curve to the horn, now is the time to make it.
Roll out the sculpey into snakes and flatten the snakes. I use a roller and small strips of wood on each side so I have a nice even thickness, again, so it bakes well. The flat ribbon of clay is wrapped around the aluminum cone, and you put a layer of the clay on the bottom too. Smooth it all together then apply any decorative strips of clay you desire to make it pretty... or ugly... or gnarly.
Bake according to directions on the package. Remember that sculpey can be baked longer than recommended but NEVER hotter than recommended.
When cool enough to handle remove the toothpick. Paint and then thread in the fishing line. I make the line about the size of the head then tie a loop on each end. Then the ribbon is threaded through each loop and you can use it to cinch the horns on tight and tie the ribbon. You can also use a few bobby pins on the fishing line up top if you like.

Like I said, I did this today with my kids, ages (almost) 10, 8, and 6. I have been working very very hard on controlling that impulse to "fix" my kids projects. I still have to do most of the work for my 6 year old though because, well she's 6 and a bit spoiled.

They are drying now and I just snapped a pic.

P1020628.jpg

The two white ones are mine of course. The other one in the back is Jordi's. I ended up doing most of the work on hers, she put holes all over the place and painted it though. Jay's is the redwood-red and white one. Tali's is the bloody looking one.

Wednesday, October 27, 2010

Halloween 2010

My kids watch a lot of Netflix. Mostly they watch Avatar (Airbender not blue people.) I enjoy watching it too, which is good because I would have been lost when they told me what they wanted.
So if you aren't familar with the characters, here is the official site for each of the ones the kids picked this year:
Toph

Sokka

Katara

Here is how they turned out:


P1020618.jpg picture by teljchall


A few notes:
James wanted to be Ang, but I nixed the idea when he insisted I could come up with a way to make him airbend. Sorry dude, I'm not putting fans up your sleeves. The thing on his head is a white swimcap that I put make-up on to fleshtone and sewed a section of a wig onto. It made his ears stick out, but he wouldn't wear it over them. The weapon is made of a ball, a coat hanger, a few oven liners, cardboard and aluminum tape.
Talitha helped make her costume. Her father didn't much like the idea of her first sewing experience being on a serger, as he lost a duel with one once, but oh well, she can meet a regular sewing machine later.
Jordan went through all the female characters before we settled on Katara. I just couldn't let her be Azula.

Saturday, October 23, 2010

Face Painting

I love to do face painting, I really do, except for one thing, the monotony. Even when presented with a variety of options, kids tend to pick safe things, hearts, flowers, spiders, rainbows. You can only paint just so many hearts in a day.

So I developed a plan to show kids how cool other options can be. I made a big board with pictures of faces with a variety of options.

P1020562.jpg


Then I dressed up in a medieval gown and painted my own face.

P1020614.jpg picture by teljchall


I painted faces for seven solid hours and only did about 10 hearts, 2 flowers, and 5 rainbows. I got to do old age make up twice. I probably did fourty different "Fairy masks" and nearly as many "Batman masks."

Spiders, however, will be a favorite no matter what the season, and there is no getting around that.

Friday, October 22, 2010

The Witches Brew

This is something that I cooked up at work for an event later this month. I left the lettering to my friend, I just did the fun part.
IMG00083-20101014-1926.jpg picture by teljchall

IMG00084-20101014-1926.jpg

Tuesday, October 5, 2010

S&ST #8

Glitter ball = $3.75
Candle jar ring = $4.99
Crystal ball that is "magically" unbreakable= Priceless

P1020481.jpg Crystal ball picture by teljchall

Friday, October 1, 2010

Bath remodel

I'll start off by saying I had help with this one. Joe and the handy man did the tub/shower, toilet, and sink install, plumbing, drywall, electrical, and helped lay the hardi-backer for the tile. I just did the demolition, clean up, remaining hardi-backer, painting, trim, tile, shelving, caulking, grouting, threshold laying, hardware hanging, and decor.


I'm going to show you this picture first, because in it you can see the inspiration piece. When I decorate I have to have one thing I use to tie the room together, something that puts in my mind what I want the room to be. I found the canvas print above the toilet at... ahem... Wally World. The gray scale nature scene called to me and I realised I could build a bathroom around it. Gray is the hot neutral these days.

P1020462.jpg picture by teljchall

I didn't know what I was going to do for cabinetry, until I went on vacation and saw this in our hotel bathroom. This is where you picture me with a wicked grin and a light bulb over my head.
IMG00048-20100813-2307.jpg picture by teljchall


I didn't HAVE to do cabinets. I could do cubes, squares, like tiles, and the picture! The rolled up towels would also mimic natural shapes!


To go with the print I also had printed a bunch of b&w photos of nature that I have taken. Naturally they are edited liberally and didn't look much like this when I took them, but I am quite happy with the results. I also covered a jar with gray seashells and purchased some brick-a-brac to throw in or paint and throw in.


So without further ado, this is my hall bathroom:


Oops, forgot the "before" pictures, I snapped these right before I got out the crowbar:

IMG00059-20100910-1016.jpg picture by teljchall
IMG00057-20100910-1016.jpg
IMG00058-20100910-1016.jpg

Thursday, May 20, 2010

S&ST #7

Tali's first swim meet is coming up, and it's a Luau theme. Apparently there is some prize they have won several years in a row that goes to the team with the supporters who dress the best in the theme.
I may be completely inept at the rest of the sports mom stuff, but costumes I can do.

P1020158.jpg picture by teljchall

The background of this is my Muumuu, floral and parrot print. I didn't like any of the leis that the store had on hand, so I bought a garland and made my own with the help of fishing line and coffee straws. I also made a leaf only one which will go on someone I am sure, along with the handful of store bought leis. I took some shells from my room and drilled out the center. Some earring hooks and beading wires and the earrings are done!
I have pink grass skirts for each of the girls, and one for me in classic tan. James has Hawaiian print swim trunks.
I seriously considered a tiki mask for James, but I really don't have time before the big day.
Now if I could only remember the Hula dance Mini P. taught me in Kirtland.

Friday, May 14, 2010

So tell me honestly,

this sucks right?
I was going for a Chaofeng, which as described on the Nine Dragon scroll is a lion like dragon, and I don't know if it's good enough to display at work to encourage kids to learn how to do paper mache.
P1020084.jpg picture by teljchall
P1020089.jpg picture by teljchall

Sunday, April 18, 2010

Solar system project

As if one project this month wasn't enough,
Tali had this due this week.
I think she did a really good job making the balls, making craters, painting inside the lines, and sticking pins everywhere. Naturally the others were very upset that she got to mess with
Mommy's sacred craft supplies.
She had to label so many things, but we were out of foil for the center of the balls, so we had to go small.
P1010878.jpg picture by teljchall

P1010884.jpg picture by teljchall